RGB.jpg)
Oliver's Blog 2016
Dec. 4 2016
Mandolin necks are under a great deal of tension. A typical set of strings tuned to pitch will exert about 160 lbs. of pull. (Picture a full grown man hanging from the strings.) Since the majority of players prefer a fairly slender neck, makers have devised various ways of reinforcing the wood of the neck in order to satisfy these needs. The tension exerted by the strings causes the neck to want to bow forward, toward the bridge. A very small amount of bow, often called relief, is actually more desirable than a completely straight fingerboard surface. This is because the strings vibrate in an arc and by having a small amount of forward bow, the string height above the frets, or action, can be set to its lowest possible height without causing string "buzz". A low action in turn, also minimizes the leverage on the neck, exerted by the strings and so also aids in reducing unwanted forward bow.
The original F-5s of the 1920s utilized a single truss rod system in order to stiffen the neck and introduce some adjust-ability of the amount of neck relief. While the design that was used did work to some extent, it did also have some inherent flaws that later stringed instruments gradually improved upon.
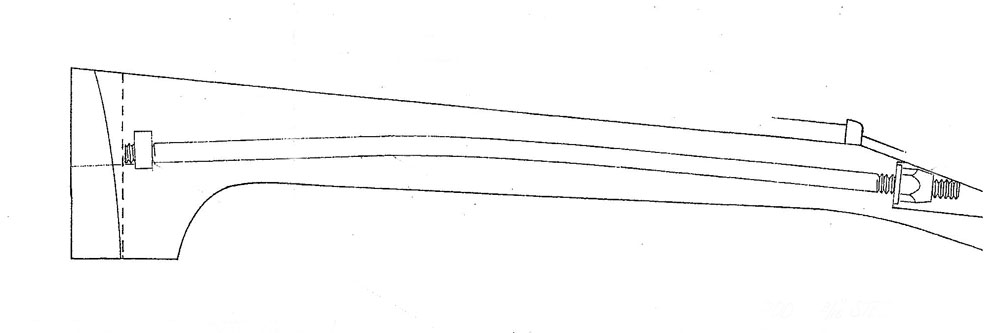
One of the flaws in the design is that when the adjusting nut is tightened, it creates a compression force on the neck which has little benefit to the amount of bowing but can lead to other problems such as neck twisting. The other main flaw is in the particular design that was used on the Loar era F-5s. On those instruments, the rod was installed with an arc that was highest in the center of the neck. Since, as the adjusting nut is tightened, the effective section of the rod becomes shorter and thus the rod wants to become straighter to eliminate the excess length caused by the arc, this design can be counter productive. If you look at the drawing below, you will see that in the way those early mandolins were done, this would mean that the neck would actually want to bow further forward instead of counter-acting the force of the strings.
Drawing of Loar era single truss rod. If the rod becomes shorter by tightening the adjusting nut, the rod will want to straighten out causing a forward bow of the neck while also adding a compressive force to the wood of the neck.
In my mandolins, I utilize a more modern design, "double rod" system. It consists of one rigid, non-adjusting square steel rod with a round steel rod welded to it at the tail end and an adjustable nut at the other. I did not design this rod myself but it is, for my purposes, the best design I have seen for use in mandolin necks. It can fit into very slender necks and the adjusting nut ends up in the same location as the original F-5s allowing for a traditional look. I have these rods made to a custom length by Luthier's Mercantile International in California. Here is one pictured below.
As you can see by the photo, the rods are welded together at one end and at the other end is an adjustment mechanism for the lower rod. By tightening the nut the lower rod it is effectively made shorter. This causes the upper rod to arc over backwards. Just adjusting the rod until it is snug will create a very rigid reinforcement in and of itself much like a solid non-adjustable steel bar would be. This is how the rods are adjusted when I initially string up a mandolin for the first time and there is rarely a need for any further tightening.
The other great advantage of this system is that it is completely independent of the neck wood itself and therefore does not add any unwanted forces to the neck.
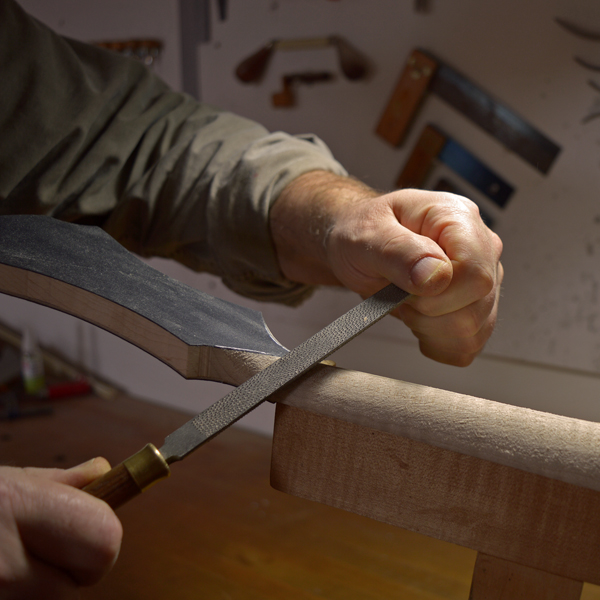
For the rod to work at its best, it must however, be properly and accurately installed. It must fit tightly in its routed cavity. Luckily this is not too difficult to accomplish. I use a round nose router bit that is the same diameter as the diameter of the rod to create a channel that is 2mm deeper than the rod is tall. When the rod is installed, a filler strip of wood is glued in over the rod with clamping force to assure a completely snug fit. Here is a cross section of a neck, at the heel, showing how snug the rod is embedded in the neck.....
Note the filler strip above the truss rod.
....and here's one of a routed neck blank along with a truss rod.
Below is a drawing of how the double rod is installed in one of my mandolins.
One other detail that is not overlooked is the possibility that truss rods have of developing a very annoying rattle when certain notes are played. While installing the rod very snugly goes a long way to prevent this, I go one step further and apply some silicone rubber between the two rods. Then, just before the rod is permanently installed, I also apply a bit of silicone rubber to the bottom of the truss rod channel thus eliminating any possibility of a rattle developing down the road.
In my approach to building mandolins, I have a huge reverence for the great instruments of the past but I am not dogmatically closed to the possibility that there are still areas where further refinements can be made. The original truss rod design, I believe, is one of those areas.
Thanks for reading,
Oliver
The "Wabash Cannonball"
November 3, 2016
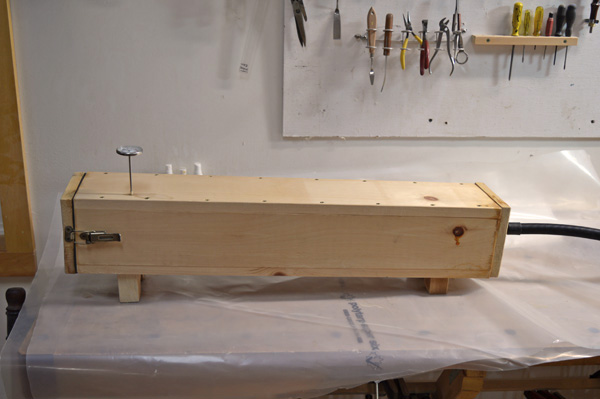
After 40 years of bending the sides for my instruments over a hot pipe, I have moved into the steam age! I finally got around to making a side bending fixture that utilizes steam to pre-soften the wood for the rims. The impetus for this was the introduction of my new Jazz models or as the youngin's like to say J-models. Bending the scrolls for an F-style mandolin by hand over a hot pipe can get quite intense. A liberal mixture of experience and patience is required to get the side to fit perfectly in the form for consistent results. It is not uncommon enough to spend an hour or more on just the right curve of the scroll only to have it break apart in your hands when you are nearly done. (I have been known to mutter expletives such as 'fiddle dee dee' or 'peanut brittle' after just such an event) I don't know what on earth I was thinking when I designed the cutaway for the Jazz models but I clearly wasn't thinking of the practical limits of bending wood over a hot pipe! Actually, I wanted a cutaway that had the look of the classic Jazz guitars of the 40s and I wasn't willing to compromise with an easier design. The tightest curve of the cutaway ended up about twice as tight as the already skill testing F-5 scroll. So, how was I going to accomplish this?
I decided to try steam. After all, this is what I am lead to believe was used to bend the sides of the original F-5s of the 1920s. Turns out that it can work quite well once I refined my technique and made a decent bending fixture. Below is a photo of the simple steam box that I put together. Steam from a small steam generator is introduced through a hose at the back end of the box (right, in photo) and a small vent whole is drilled in the hinged door to allow the steam to travel the length of the box.
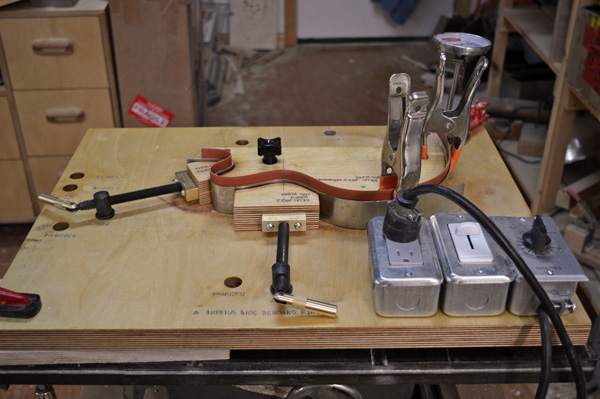
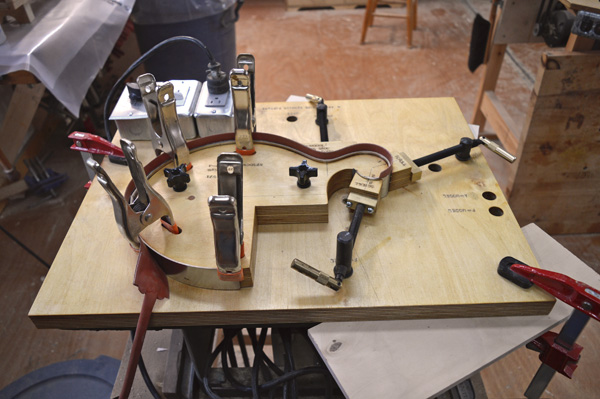
Once softened with the steam, the side is removed from the box and placed on the bending form where it is clamped into place and the excess water driven out by the use of a commercial heat blanket. The photo below shows the fixture in action bending the tight curves of my cutaway Jazz model.
Since I had made the fixture to bend the sides of my Jazz models, I took advantage of the steam technology and made a form for my F-styles as well. I should have done this a long time ago. This method creates beautifully consistent curves and an increase in overall quality.
One drawback is that (all gains are accompanied by some loss) this method creates a heck of a lot of steam! So much so that the humidity levels in my shop shoot up from 40% RH to 60% in less than an hour. During the colder months, when I'm heating the shop this takes less than a day to get back to 40%. I suspect that during the hot and relatively humid summers here, I will have to take this apparatus outside to do my bending or cause my dehumidifier to run overtime!
Thanks for reading,
Oliver
October 5. 2016
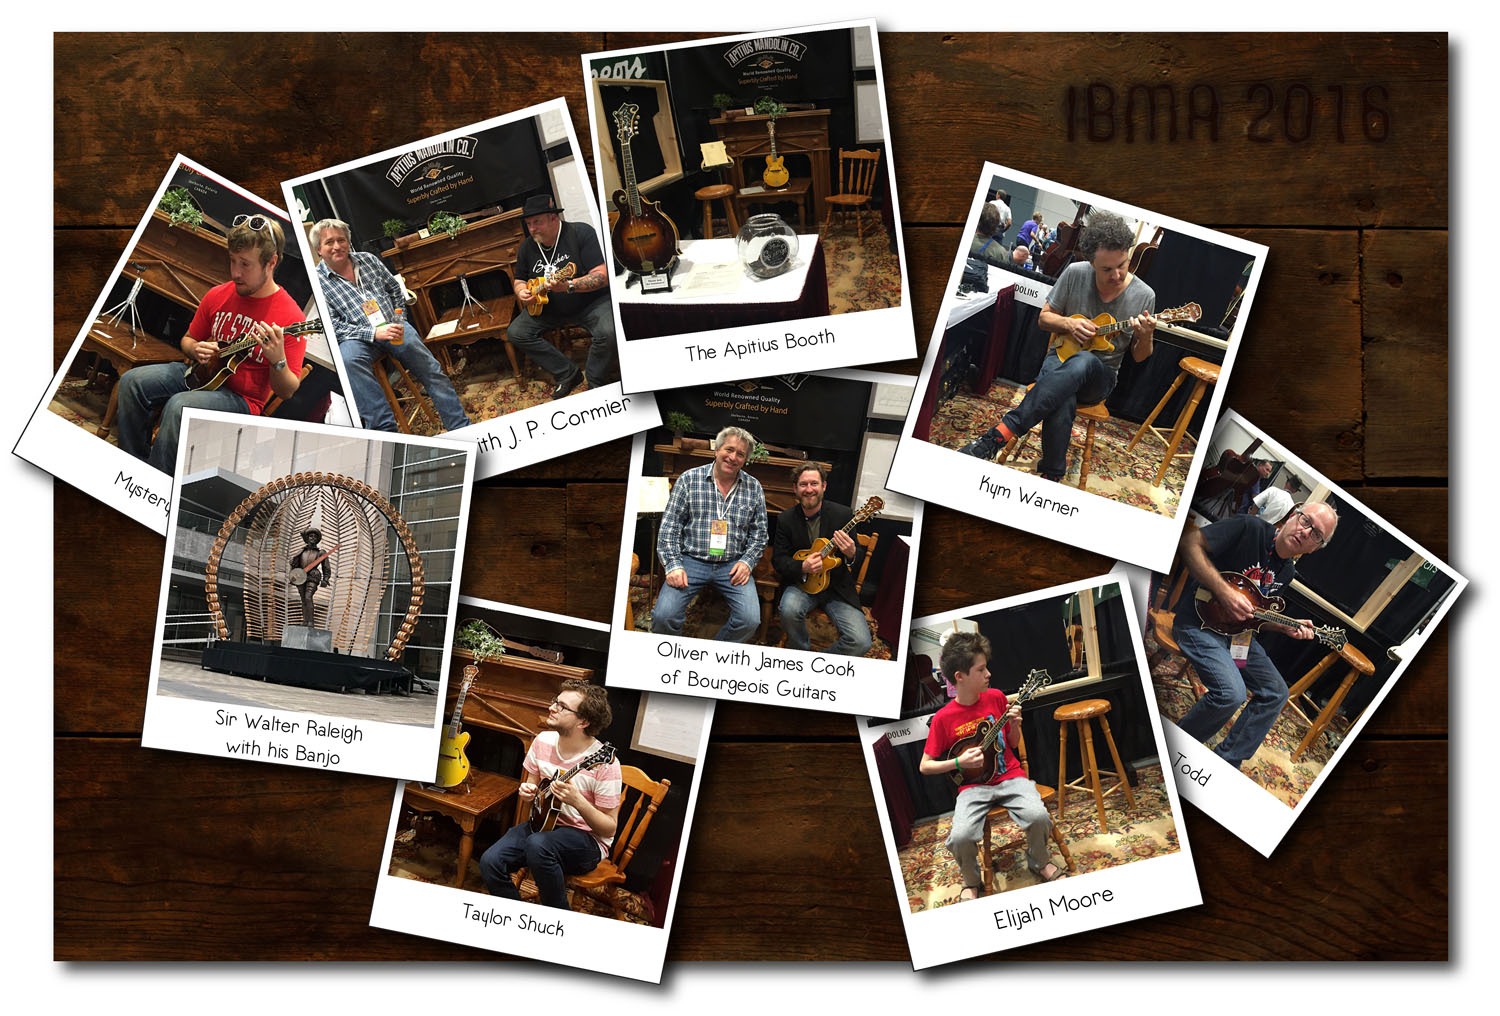
Well, we just drove in from the IBMA Trade Show and boy, is my butt sore! We were sitting in the car for 14 hours straight!
I'm a little late in writing this post as I am still tying up all of the loose ends and sending thank yous and greetings to all of the contacts that we made while down in sunny Raleigh, North Carolina. The trip got off to a slow start as we were held up at the border for 7 hours while we got the proper paperwork to bring in three mandolins valued at over 20,000.00 US dollars. You see, in my defense, the last time that I attended the IBMA trade show in 1992, I just told the nice border guards what I was doing and where I was going and they said, 'that's great. enjoy your trip.' Things are a little different today and I should have been better prepared. I will be, next time.
Anyway, it was a beautiful drive down through the mountains. The folks are very friendly and helpful to strangers. We met so many nice people at the show. There are too many to mention all by name. My wife Jody was in charge of taking photos so of course I packed the camera with various lenses, filters and even a tripod. What I didn't pack was an SD card, which rendered the camera useless. Very fortunately for us, the booth next to ours, Bourgeois Guitars, was manned by one of the most friendly and helpful guys you could ever imagine. James Cook was his name and hospitality was his game. James quite kindly offered to lend us his cell phone so that Jody could take photos of some of our visitors and he then uploaded them onto a photo sharing site where we were able to retrieve them. THANKS BRO! (We also learned that we had an endorser in common. Dan Tyminski endorses and plays Bourgeois guitars as well as Apitius mandolins.)
A few of the other people we met were David Benedict (a brilliant young mandolin player based in Nashville TN), Kym Warner (born in Australia now residing in Texas with 3 Grammy nominations under his belt, a member of "The Green-cards" and a solo album, "Everything that Brought Me Here"), Elijah Moore, a very young mandolin player with awards under his belt! (watch for him) J. P. Cormier, a fellow Canadian dropped by several times (more on that later)
Again there were way too many to mention all by name but we enjoyed meeting you all!
Before the show, I custom shaped 600 guitar picks and offered them for 25¢ or 3 for a dollar (bluegrass math?) but in fact, we intended all along, to hand them out for free, which we did and they seemed to be really well received.
One of the big draws to our booth was the new jazz model mandolin, "The Yorkville". J. P. Cormier came by with very kind words for my mandolins and started to tell me that there was this store, up in Canada, The Twelfth Fret, that sometimes carried an Apitius mandolin. Turns out, he knew of my work for years and didn't realize that I also was Canadian. Once J.P. got that jazz model in his hands, well, love at first sight comes to mind. J. P. was at the show representing Boucher guitars. 'High -end guitars from Quebec. He is such a warm and unassuming guy and "that boy can play."
Kym Warner of the Green-cards was also very enthusiastic about the jazz model. The Green-cards had not been on my radar until I met Kym but they definitely are now.
We were also honored by a visit with David Benedict. David is a very talented player who is currently playing mandolin with Missy Rains and the New Hip. David really liked the new "Vanguard" f-model that I brought along. So much so that we set up a private test drive in a more acoustically friendly environment. (I think there may be a new Apitius in his future!)
Again I would like to say thank you to all the wonderful people we met. I spend most of my days alone in my shop and it sure is a shot in the arm to meet so many people who appreciate what I do in there.
'hope to see you all next year if we can make it.
Thanks for reading,
Oliver
Click to enbiggin
August 28, 2016
The term "hand-made" is difficult to define. I think the majority of us would not consider a modern, mass produced automobile to be hand-made even though some of the various components are bolted, screwed or snapped into place by real human hands. Where then does the legitimate use of the term hand-made begin? I've heard some people argue that a computer guided router (CNC) is "just another tool". Still others have said that if any tools are used, then an object is not technically made by hand and so the term hand-made is completely meaningless. But if the term is meaningless, why do so many producers of goods use the term? I think it is because most of us have an image of what it is to be made by hand as opposed to mass produced and these manufactures want to evoke that image in connection with their product.
I can't clearly define the term hand-made. I think that there is a fairly wide gray area that comes down to the subjective opinion of the individual. I do however, believe that my mandolins can truly be called hand-made with very few who would seriously argue the point. One person, starting with raw materials then making all of the constituent parts using a combination of hand tools and basic woodworking machinery, then assembling those parts one or two at a time with hot hide glue and finally, applying a proprietary spirit varnish of natural resins with a hand held wad of cloth known as a "fad" most certainly qualifies Apitius mandolins as hand-made.
Is hand-made better? Not necessarily. Without a high degree of skill, knowledge and experience, a hand made thing can be more aptly termed "home-made". ( I won't get into defining "home-made" but I think you get my drift.) Instruments made on a production line can be quite good and if not really good, certainly good for the money, but to get to the very highest level, I believe that making by hand by a dedicated and skilled craftsperson is still, and will probably always be, the absolute best method for true excellence.
A dedicated and passionate artisan can take the time to use all of his/her senses when constructing the instrument. In the world of instrument making, the only way to make gains in sound quality and playability is to pay close attention to the very slightest of details. Getting one or two details right will often not be manifested in a noticeable improvement in sound quality but the accumulative affect of getting many details right will. As an independent luthier, I can, and do, take time to feel, flex, tap and smell the wood I am working with. When I am tapping a top or back plate to listen for it's response, my shop is quiet. There is no din of other workers running machinery. I can focus intently on the sound.
Making by hand also results in truly unique instruments. Each one, while having the characteristic voice of an Apitius mandolin, also has its own individual character. For example, the way I arrive at the mandolin's neck profile is by carving it down by eye and then after the instrument is put together and the fingerboard glued on, I feel the neck with my hand in a manner so as to imagine playing it. I then make fine adjustments with rasps and sandpaper until I feel that the neck is very comfortable for playing. I believe that subtle details like this is what separates very good mandolins from something extraordinary.
Thanks for reading,
Oliver
August 1, 2016
Binding is one of those things that can be a little confusing for someone who has not researched the topic at length so today I thought I'd give a little primer on binding as it applies to fretted instruments. To start at the beginning, binding is the strip of material, typically about 1/4" wide, that is inset at the edges of the instrument. It can be made of varying materials but is most commonly some type of plastic or wood. For the past 100 years, the most common material for binding on fretted instruments has been celluloid nitrate plastic that is made to resemble ivory. It is known as "grained ivoroid". It consists of alternating shades of ivory that form stripes in the material to imitate the grain found in genuine ivory. (I do not use any real ivory in my instruments) Wood bindings and other types of plastic bindings are also not uncommon.The main purpose of bindings are to protect the vulnerable edges of the instrument from accidental bumps and knocks. The top of the instrument is especially vulnerable as it is made from relatively soft spruce. The binding is inset into the edge of the instrument and as it is made of a harder material, is better able to withstand minor knocks. Some builders say that the binding also, or even mainly, is there to seal off the end grain regions of the top and back plates. I can see no reason that the binding would be any better at this than the finish, be it some type of varnish or lacquer.
Another function of the binding is decorative. The binding, which usually has a contrasting color to the instrument, helps frame and define the shape of the instrument. In addition, it is quite common for makers to add additional thin strips of material to the binding solely for decorative purposes. These thinner strips of contrasting colors are called "purfling". On mandolins, you will quite commonly see these black and white purfling lines on the top surfaces of the plates. This is often referred to as "top bound". I find the term a little inaccurate as it would be more accurate to say "top perfled" . This same configuration is also referred to as "triple bound top". Which is technically more accurate than "top bound". I'm not about to try and stem the popular nomenclature for the different types of binding options on a mandolin so I have also come around to using the term, top bound. It does simplify conversations between those up on the lingo but it can be a little confusing for the novice.
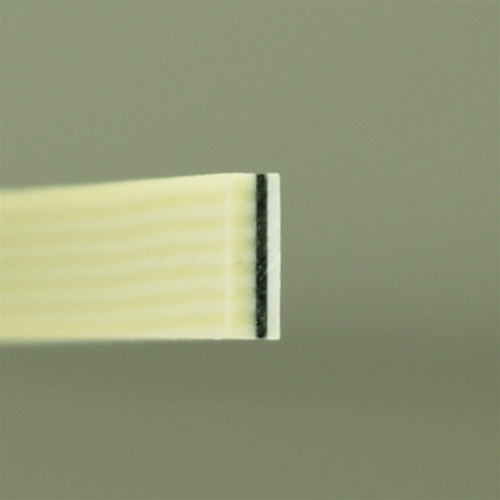
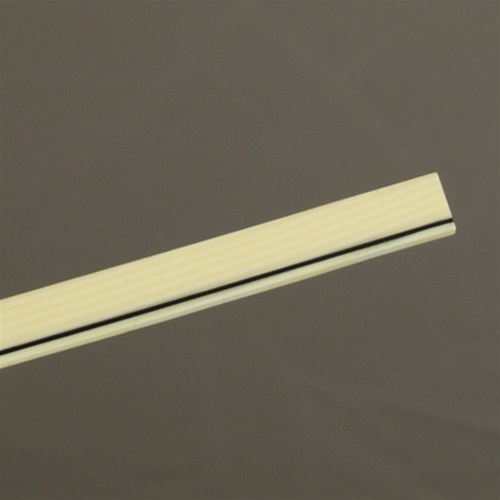
Here is a photograph of a "top bound" mandolin body along with a photo of an actual binding strip of grained ivoroid laminated to black and white purfling strips that create the "top bound" effect.
Grained ivoroid binding strip with black/white purfling lines for top bound effect.
(Photo courtesy of Axiom Inc.)
Next is a photograph of a "side" bound body and a photo of an ivoroid strip laminated to black and white purfling strips to create the side bound effect.
Grained ivoroid binding strip with black/white purfling lines for side bound effect.
(Photo courtesy of Axiom Inc.)
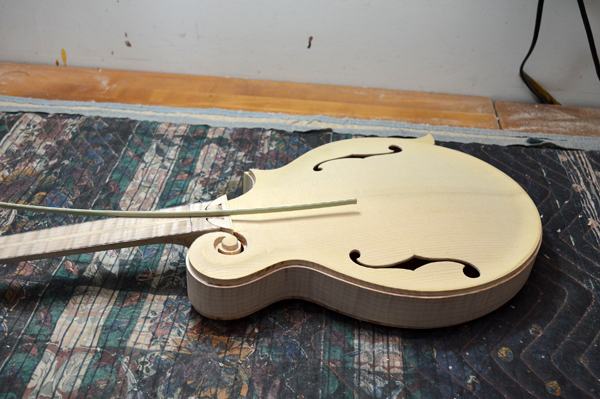
The next photo shows how the edges of the body are routed to accept the binding strips. This type of routed ledge is called a rabbet. Note: The scroll area cannot be accessed by a conventional router and so I cut this section with various hand tools.
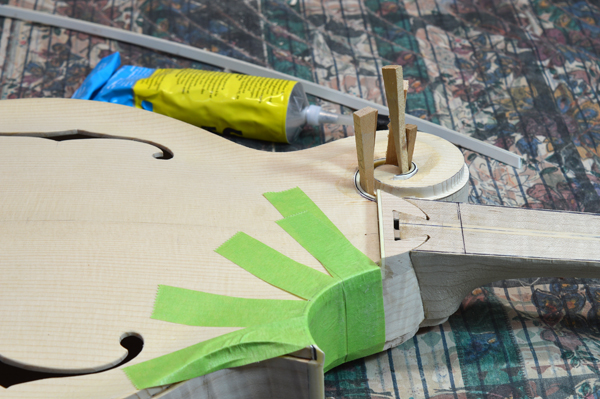
The binding strips are first softened with heat and then bent into the shape of the body contours. They are then glued into place with a special glue that partially melts the binding and fuses it to the wooden body of the mandolin.
Once the glue has dried, the bindings will be scraped flush to the body.
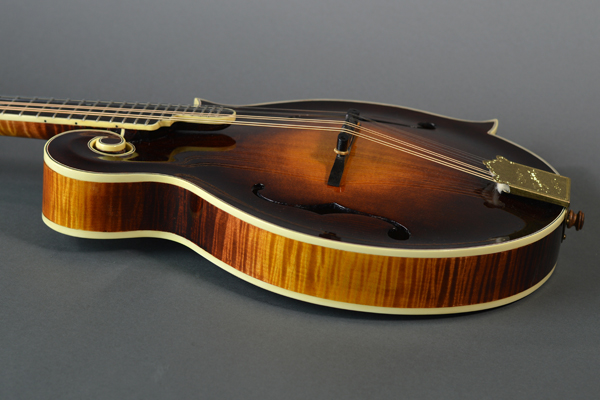
Much of the difference in my F-style mandolin models is in the style of binding. The famous Lloyd Loar era mandolins of the 1920s were bound in different ways at different times and my models reflect the main binding schemes used in those instruments. My "Vanguard" model has binding very similar to the early F5s, with side bound neck and peghead and a top bound body. The "Rosine" model is side bound throughout as were a small number of F5s in the July 9, 1923 batch. Most notably, one of those was the favorite mandolin of Bill Monroe the "Father of Bluegrass". My "Classic" model is top bound throughout as was typical of the later period 'Loars. I occasionally make mandolins with both side and top binding. No Loars, to my knowledge, where ever done this way. I call these mandolins my "Grand Classic".
Thanks for reading,
Oliver
July 9, 2016
In today's blog, I'm going to do my best to demystify the relation of wood to humidity. I'll start by describing what we mean by terms like humidity and relative humidity. Humidity is a term for the amount of bound water molecules in the air. If you measured the amount of water in a defined volume of air, say a cubic meter, without regard to temperature, that would be the absolute humidity. (usually expressed as grains per cubic meter) In the real world, what is important is the relative humidity and not the absolute humidity. Relative humidity refers to the amount of water molecules that can be bound in the air at a given temperature.
The warmer air gets, the more water it can absorb. Relative humidity means, the amount of actual water in the air relative to the maximum amount of water that the air could hold at that temperature. So for example, if we have a volume of air with an amount of bound water in it that is equal to 50% of how much water the air could hold at that temperature, it is said to be at 50% relative humidity or, commonly abbreviated to, 50%RH.
Now, if we take that same volume of air and heat it up, it now has the ability to carry more grains of water but if the absolute amount of bound water remains the same, then the relative humidity will drop because it now has less than 50% of the water that it potentially can hold. This is exactly what happens in the winter months. The outside air is cold and say, at 50% relative humidity then we heat it up with our central heating and unless we are adding moisture to the inside air, the inside air drops in relative humidity. It is not uncommon for heated homes and apartments to get down to 15%RH (worse than desert conditions) if humidity is not added to the inside air.
Now here's how this relates to your wooden instrument. Wood, all wood, is hygroscopic which is a fancy term for saying that it picks up or releases water depending on the relative humidity of its surroundings. If the relative humidity stays steady at a given amount then eventually the wood will reach an equilibrium moisture content (EMC) with its environs. The exact moisture content (MC) of wood in equilibrium with a given RH will vary somewhat from species to species. The various spruces used in making stringed instrument soundboards will generally have an actual moisture content by weight of 7% when in equilibrium with a relative humidity of 37-40%RH. Problems arise because as wood takes on water it actually increases in size and as it gives up water or MC, it actually shrinks. This is a property of wood and remains a property of the wood as long as the wood is still wood. We cannot change that. What we can do is learn how to deal with that fact.
Imagine a spruce mandolin soundboard being glued to a rim in an environment of 40%RH. The soundboard is measured at say 250mm across at its widest point. Now the instrument is completed and is sold to a customer who takes it home in the winter time to his heated home. If that home is not being humidified and has gotten down to say 15%RH the soundboard will now start to release moisture which will then cause the soundboard to shrink. Going from the 40%RH at which it was built to 15%RH in a heated home will cause an actual shrinkage of the soundboard in excess of 1 full millimeter. The problem is, the rim does not change in diameter, in any significant way, which means that the shrinking soundboard, which is glued to the rim, feels itself under tension and somethings 'gotta give. Either a crack develops in the wood to relieve the stress or a seam lets go.
In the summer, when the humidity goes up beyond the 40%RH that the instrument was glued together in, the wood swells in size. This time, though the rim is holding things in place, the soundboard does have somewhere to go. It can bulge up causing the string action to rise. Although the soundboard does have some room to maneuver, there is a limit and if the RH gets too high, the stress caused by the expanding wood will typically lead to seams letting go. Since high humidity is very often associated with high temperatures, these conditions will also weaken glue joints while putting the stress of the expanding wood on them. In actual numbers, a spruce mandolin soundboard that was glued up at 40%RH will grow by nearly 3mm when at an equilibrium with an environment of 80%RH
The key to avoiding problems caused by excesses and extremes of humidity is to keep your instrument from being exposed to these extremes. Solutions for excessive dryness include using a whole home humidifier on your furnace, using a room sized humidifier in the room where you store your instrument or using a humidifying device in a case in which you store your instrument. My preference is in using a whole home humidifier. It requires the least amount of ongoing maintenance and is good for the human occupants of the home as well. A room size humidifier can do a good job if correctly sized and maintained. Using a device in your case is my last choice. I find that these require a lot of maintenance and monitoring. It is difficult to insure that your are adding the right amount of moisture and not overdoing it.
Here comes one of my real pet peeves and that is that the typical hygrometers you buy at the hardware store are very often very badly calibrated. It's OK for me, I have sling psychrometers to calibrate my hygrometers because it is my business to maintain proper humidity levels but it is not so good for the average person. Proper calibration of your hygrometer is essential in maintaining proper humidity levels in your home. Other wise you could be lead to believe that you are maintaining the the proper level, which by the way is 40 - 50%RH, when in fact you are not. I wish I had a good answer for this. Here in the Toronto area, I know of one music store, The Twelfth Fret, that will calibrate your hygrometer for free if you bring it in. Maybe there are other reputable shops in your area that will do the same for you.
So the main takeaway is, keep your instrument at a comfortable humidity level, avoid extremes and you will be able to pass it along to your grandchildren in perfect working order.
Here is a handy chart that I drew up. It plots the equilibrium moisture content of a typical spruce species vs relative humidity and also shows the actual dimensional change that occurs across a 250mm wide mandolin soundboard. Keep in mind that the maples used for the back actually have a larger coefficient of expansion than the spruce top. This is even more so in rift-cut and slab-cut backs which are popular for their figure.
Click on the image below for a PDF version sized for printing on 8.5 X 11 paper.
Thanks for reading,
Oliver
June 26, 2016
Varnish is much talked about yet widely misunderstood in mandolin circles. You will often hear someone say, "This mandolin has a varnish finish." or "Is that mandolin varnished or lacquered?" One of the misconceptions starts with the meaning of the term, "varnish". Merriam Webster defines varnish as;
a: a liquid preparation that when applied to surface dries to form a hard lustrous typically transparent coating
b: a covering or glaze given by the application of varnish
c: (1) something that suggests varnish by its gloss (2): a coating (such as deposits on an internal combustion engine) comparable to varnish
As you can see, the term varnish does not specify any certain material(s) but rather any coating that is transparent and lustrous. A mandolin manufacturer is free to call a nitrocellulose lacquer finish "varnish" as lacquer is actually a type of varnish. (I have also seen claims of "Hand-applied lacquer". I guess that means that a human being held the spray gun, but I'll delve into the meaning of "hand-applied and "hand-made in a future post)
Personally, I have always thought that the bottom line is, how does the resulting instrument sound? As a musician, sound and playability should be the overriding concern. If one instrument is lacquered and sounds better to you than another-one that has a "varnish" finish, then, for the most part, you needn't fret over the composition of the varnish. A "varnish" finish cannot make an inferior instrument sound better than a superior instrument with a well applied "lacquer" finish. What I have come to believe, through, personal experience as an instrument maker, is that the best finish will "get out of the way" of the instrument's sound. I also refer to this as being "acoustically transparent".
By nature, I am a very skeptical person. I like empirical proof of a claim. In the case of the importance of one type of finishing material over another, I thought for years that this was probably more marketing hype than anything substantive and so I put trying different finishes at the bottom of my list of experiments aimed at refining my sound. In my defense, early in my career I visited a large and respected guitar manufacturer where, among other things, it was explained to me, how their nitrocellulose lacquering process was a marvel in achieving a superior sound. I then spent a good deal of time learning and perfecting my method of applying a spray lacquer finish so I felt no need to change things in that regard but after years of hearing talk of the benefits of "varnish", I decided that it was time for me to prove to myself, one way or the other, if there was anything to all the hype.
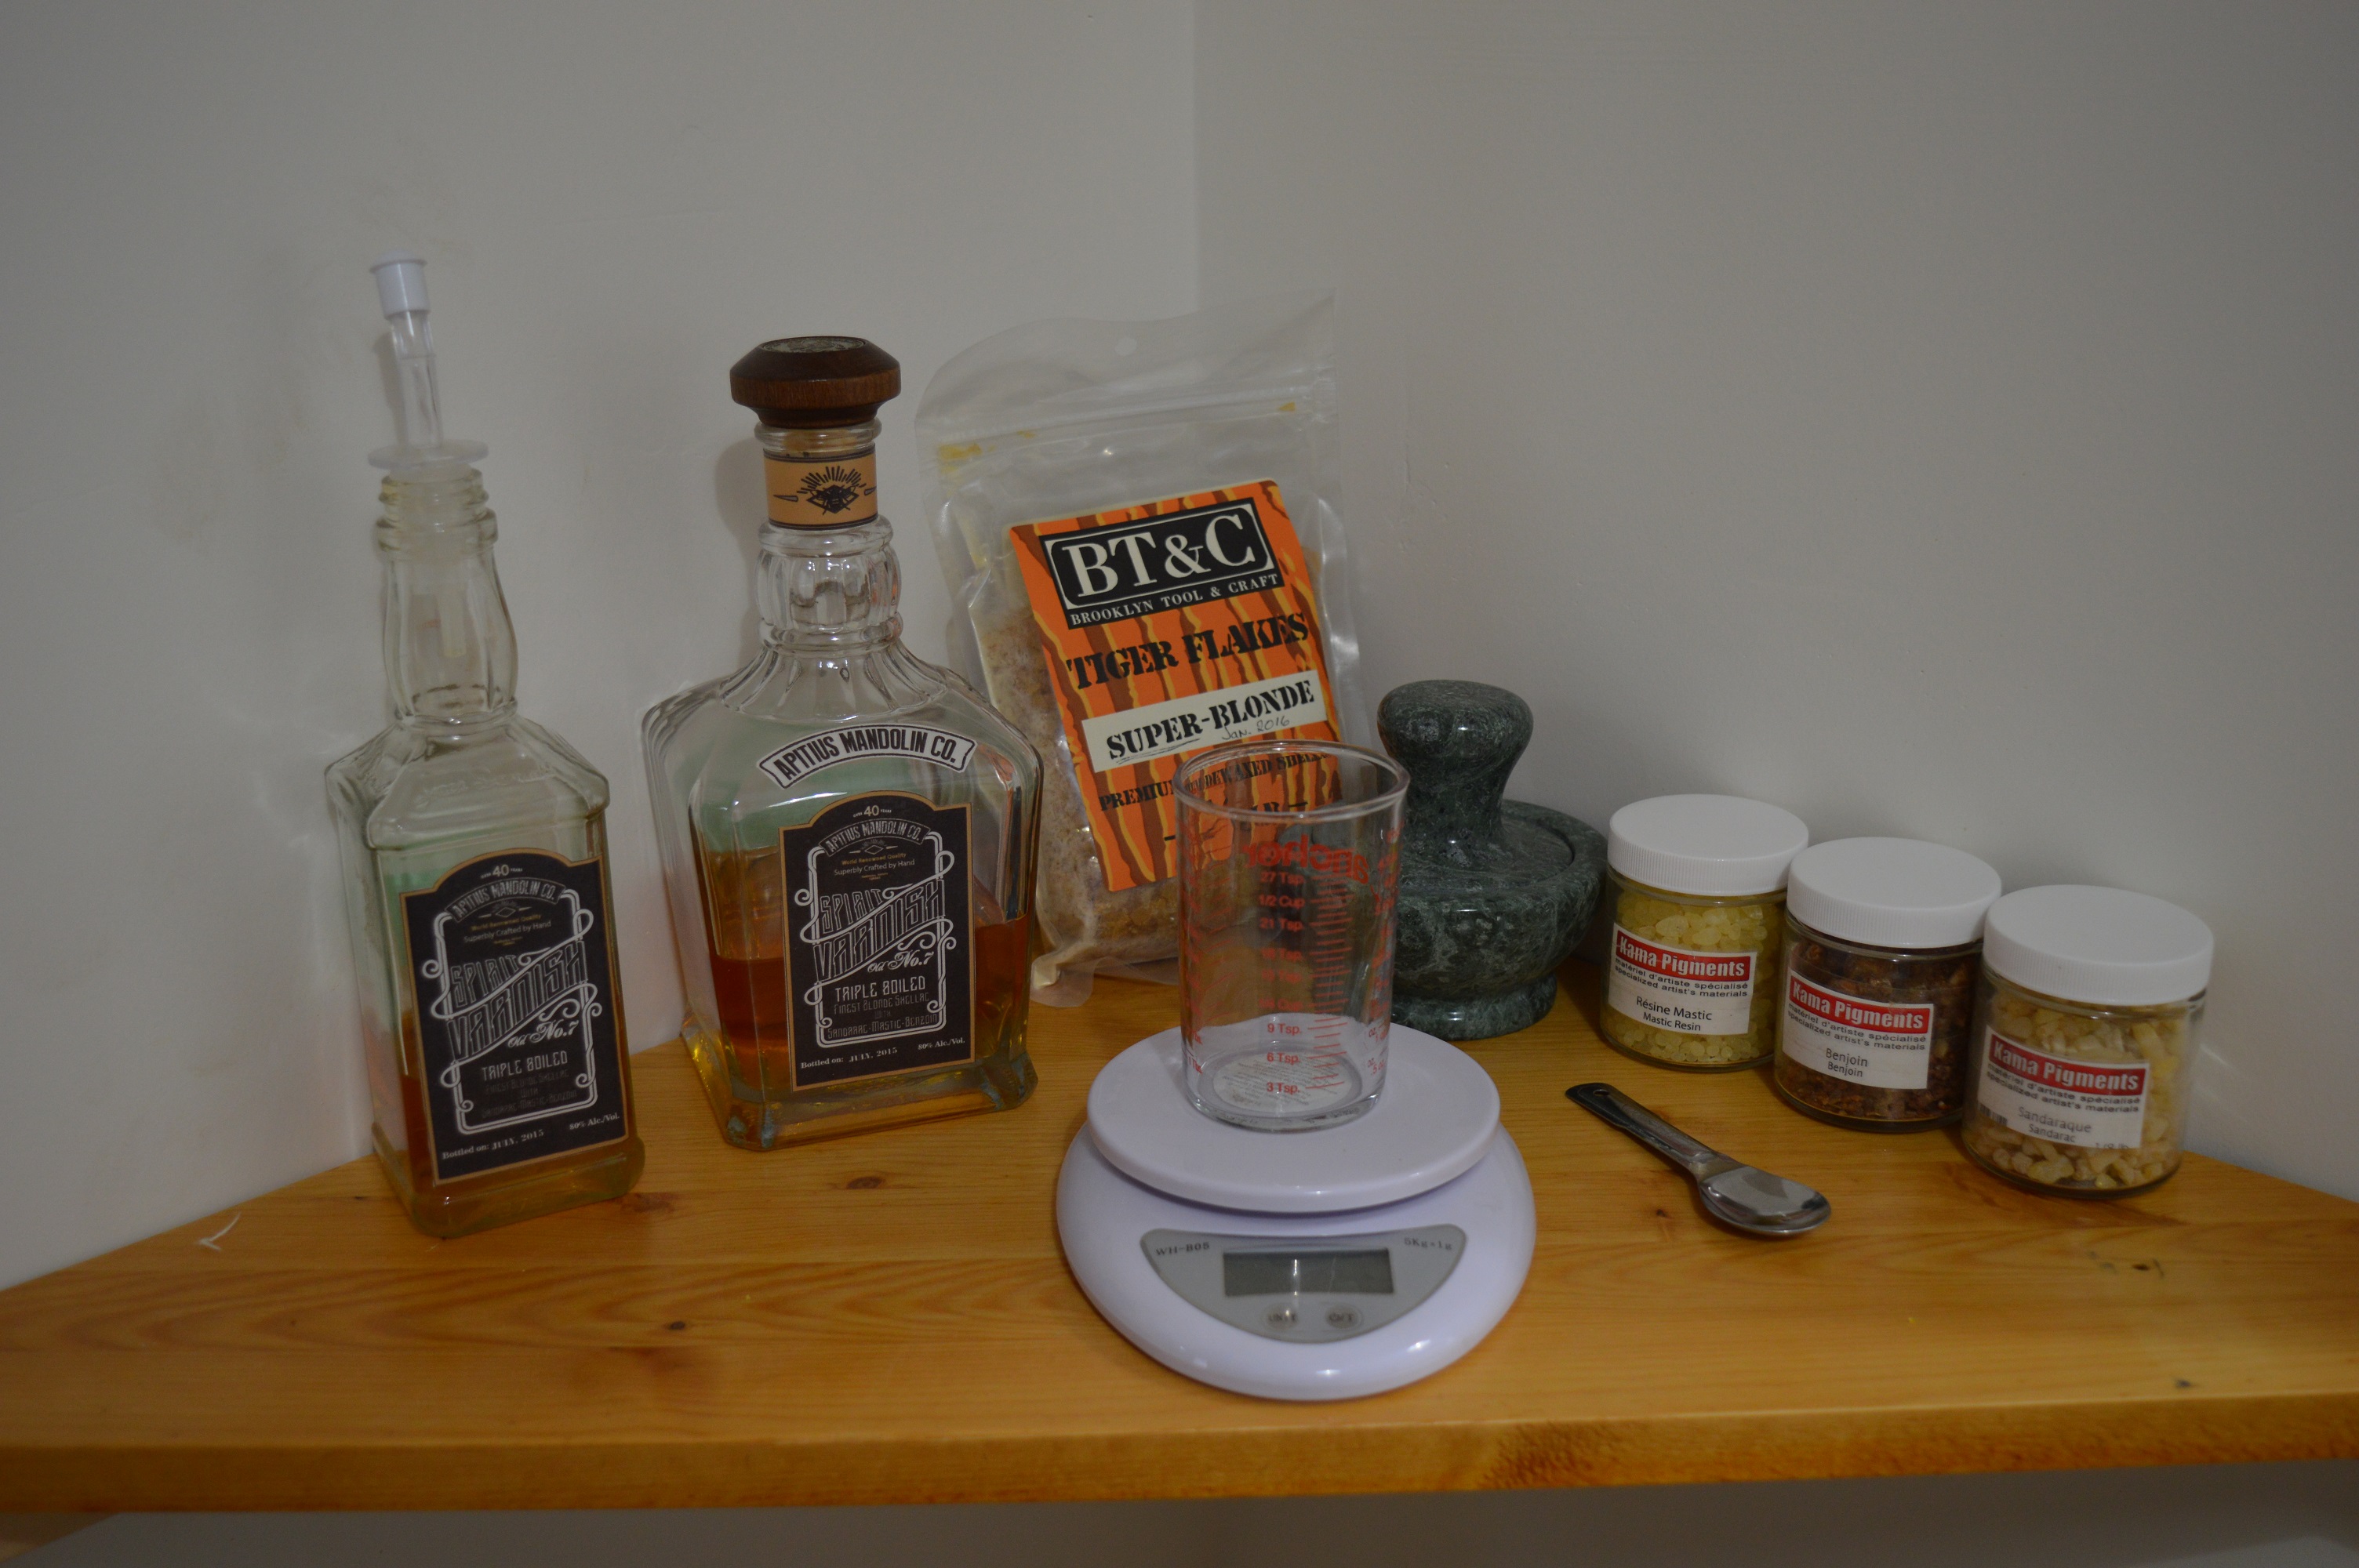
To make a long story a little shorter, I spent hours and hours researching and learning the art of French-polishing and when I felt confident enough to finish a mandolin this way, I was very impressed with the results, to say the least. The mandolin just had an openness and vibrancy that I had never heard in a brand new instrument before. In addition, it had a great neck feel, as if it had talcum powder rubbed onto it. My lacquering days were over! Other benefits included no more breathing in toxic chemicals and feeling much better about my environmental footprint. The ingredients in shellac, which is used in French-polishing, are completely non-toxic and sustainable. The principle ingredient, shellac, is a natural resin secreted by the lac bug. It is edible and is used for such things as pill coatings and candy coatings in the food industry. The solvent used is pure ethyl alcohol, which is the type found in beer, wine and spirits and so it is also completely non-toxic in small quantities.
Of course, now that I am a convert to the crucial role that the finishing material and method plays in the ultimate sound of the instrument, I am continually striving for the best possible varnish recipe. I have done many, many experiments and tests with different oil varnishes and different spirit varnish recipes. Perhaps I'll post my conclusions and thoughts on the oil vs spirit varnish debate another time.
Thanks for reading,
Oliver
Back to Top
© 2016 Apitius Mandolins
All Rights Reserved


 1200 X 918 June 2016.jpg)